
Our Potato Growing Guide covers planting, growing, and harvesting one of our favorite vegetables! Also, see tips on how to store potatoes to keep them fresh and some homemade potato recipes.
About Potatoes
Potatoes can be planted very early in the gardening season, as you soon you are able to work the soil!
Folklore offers many “best days” for planting potatoes:
- Old-timers in New England planted their potato crops when they saw dandelions blooming in the open fields.
- The Pennsylvania Dutch considered St. Gertrude’s Day (March 17, aka St. Patrick’s Day) to be their official potato-planting day.
- Many Christian farmers believed that Good Friday was the best day to plant potatoes because the devil holds no power over them at this time.
See more information about planting potatoes below.
When to Plant Potatoes
Potatoes prefer cool weather.
In Northern regions, some gardeners will plant the first crop of early-maturing potatoes in early to mid-April, 6 to 8 weeks before the average last frost date or as soon as the soil can be worked. Potatoes can survive some cool weather but the threat of frost is a gamble. If there is a threat of frost at night, temporarily cover any sprouted foliage with mulch or an artificial covering, such as old sheets or plastic containers (and be sure to remember to remove the coverings in the morning).
- To avoid frost, consider planting potatoes 2 weeks after your last spring frost. You may plant earlier, as soon as soil can be worked, but be aware that some crops may be ruined by a frost or overly wet soil.
- The soil, not the calendar, will tell you when it’s time to plant. The temperature of the soil should ideally be at least 45° to 55°F (10°C). The soil should also not be so wet that it sticks together and is hard to work. Let it dry out a bit first. Like other seeds, potato seed pieces will rot if planted in ground that’s too wet.
In Southern regions, potatoes can be grown as a winter crop and planting times range from September to February. Where winters are relatively mild, you can plant a fall crop in September. In central Florida, gardeners plant potatoes in January; and in Georgia they plant in February.
See our Planting Guide for the best dates to plant by zip code or postal code.
Preparing the Planting Site
- Potatoes grow best in cool, well-drained, loose soil that is about 45° to 55°F (7° to 13°C).
- Choose a location that gets full sun, at least 6 hours of sunlight each day.
- Grow potatoes in rows spaced about 3 feet apart.
- With a hoe or round-point shovel, dig a trench about 6 inches wide and 8 inches deep, tapering the bottom to about 3 inches wide.
- Spread and mix in fully rotted manure or organic compost in the bottom of the trench before planting. (Learn more about soil amendments and preparing soil for planting.)
How to Plant Potatoes
- In each trench, place a seed potato piece (cut side down) every 12 to 14 inches and cover with 3 to 4 inches of soil.
- If your garden soil is very rocky, put the seed potato pieces directly on the ground. Sprinkle with a mix of soil and compost. Cover them with straw or leaves, hilling the material up as the potatoes grow.
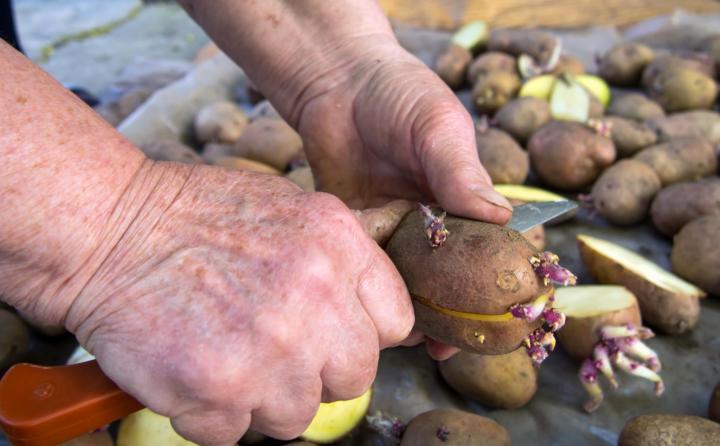
- The best starters are seed potatoes. Do not confuse seed potatoes with potato seeds or grocery produce! Select seed potatoes that have protruding eyes (buds).
- Use a clean, sharp paring knife to cut large seed potatoes into pieces that are roughly the size of a golf ball, making sure that there are at least 2 eyes on each piece. (Potatoes that are smaller than a hen’s egg should be planted whole.)
- If you are cutting up potato pieces yourself, do so 1 to 2 days ahead of planting. This will give them the chance to “heal” and form a protective layer over the cut surface, improving both moisture retention and rot resistance.
- 12 to 16 days after planting, when sprouts appear, use a hoe to gently fill in the trench with another 3 to 4 inches of soil, leaving a few inches of the plants exposed. Repeat in several weeks, leaving the soil mounded up 4 to 5 inches above ground level (this is called “hilling” and is explained more here.).
- After the potato plants have emerged, add organic mulch between the rows to conserve moisture, help with weed control, and cool the soil.
- Potatoes also can be grown in large containers or baskets. The same planting guide applies.
Check out this excellent video to see how to plant potatoes.
How to Grow Potatoes
Hilling Potatoes
A critical part of growing potatoes is to not let their tubers (i.e., the potato crop) be exposed to sunlight for too long. Exposed tubers will turn green and produce a toxic compound called solanine, which makes them bitter, inedible, and potentially nausea-inducing.
To combat this, we employ a technique called hilling.
Hilling is simple: As a potato plant grows, it produces a main stem with leaves and flowers above ground. Meanwhile, underground, tubers form on secondary stems that branch off from the main stem. In order to prevent shallow tubers from being exposed to sunlight and to encourage the plant to keep producing more tubers, a few inches of soil are periodically “hilled” up around the base of the stem. This is typically done three to four times during the season.
Tips for growing and hilling potatoes:
- Do the hilling in the morning, when plants are at their tallest. During the heat of the day, plants start drooping.
- Maintain even moisture, especially from the time when sprouts appear until several weeks after they blossom. The plants need 1 to 2 inches of water per week. If you water too much right after planting and not enough as the potatoes begin to form, the tubers can become misshapen.
- The last hilling should be done before the potato plants bloom, when the above ground part of the plant is at least a foot tall. Hoe the dirt up around the base of the plant in order to cover the tubers as well as to support the plant.
- Practice yearly crop rotation with potatoes.
- In cool growing seasons, potato vines sport berries. The berries are the fruit. Cut one open and see how it resembles its cousin, the tomato. The berries are poisonous, so they are not edible. They will not produce potato plants that resemble the parent. Discard the berries.

| Pest/Disease | Type | Symptoms | Control/Prevention |
|---|---|---|---|
| Aphids | Insect |
Misshapen/yellow leaves; sticky “honeydew” (excrement); sooty, black mold |
Grow companion plants; knock off with water spray; apply insecticidal soap; put banana or orange peels around plants; wipe leaves with a 1 to 2 percent solution of dish soap (no additives) and water every 2 to 3 days for 2 weeks; add native plants to invite beneficial insects |
| Blight (early) | Virus |
Leaves, beginning with lower ones, develop dark, concentric spots, often with yellow outer ring, and eventually die; tubers/stems also may be affected |
Destroy infected plants; choose resistant varieties; maintain proper soil fertility; ensure good air circulation; avoid overhead watering; water in morning; disinfect tools; rotate crops |
| Blight (late) | Insect |
Small, greenish gray, water-soaked spots on leaves that enlarge and turn brown, sometimes with yellow halo; white, fuzzy growth on leaf undersides; stems also affected; tubers develop reddish brown dry rot |
Destroy infected plants; choose resistant varieties and certified, disease-free seed potatoes; ensure good air circulation; avoid overhead watering; remove plant debris; rotate crops |
| Colorado potato beetles | Insect |
Yellow-orange eggs laid in clusters on leaf undersides; larvae and adults chew holes in foliage |
Handpick; use straw mulch; weed; use row covers; destroy crop residue; rotate crops. In the nymph state, they can be controlled with diatomaceous earth (food grade). If they continue to be a problem, a few sprays of Spinosad, an organic pesticide, will get rid of the beetles. Always use products at dawn or dusk to avoid harming beneficial insects. |
| Flea beetles | Insect |
Tiny black beetles that jump when spooked. Numerous tiny holes in leaves; clusters of holes, as if leaf was hit by shotgun |
Use row covers; mulch heavily; add native plants to invite beneficial insects |
| Leafhoppers | Insect |
White shed skins on leaf undersides (from nymph molting); stippling (many tiny spots) on leaves; “hopperburn” (leaves yellow/brown, curled, or stunted); reduced yield |
Knock nymphs off leaf undersides with strong spray of water; use row covers; monitor adults with yellow sticky traps; weed; destroy crop residue |
| Potato scab | Bacteria |
Brown, rough, corky spots that can be shallow/raised/sunken |
Choose resistant varieties and certified disease-free potato seed; maintain soil pH between 5.0 and 5.2; dust seed potatoes with sulfur before planting; use pine needle mulch; keep soil moist after tubers start to form; do not use manure; rotate crops |
| Tomato hornworms | Insect |
Chewed leaves (initially toward top of plant); rapid defoliation; black/green excrement |
Handpick (leave larvae that have white, ricelike cocoons, which house braconid wasp parasites); till soil in fall and spring; weed; add native plants to invite beneficial insects; grow dill as a trap crop or basil/marigolds as repellents; spray Bacillus thuringiensis (Bt) |
| Whiteflies | Insect |
Sticky “honeydew” (excrement); sooty, black mold; yellow/silver areas on leaves; wilted/stunted plants; distortion; adults fly if disturbed; some species transmit viruses |
Remove infested leaves/plants; use handheld vacuum to remove pests; spray water on leaf undersides in morning/evening to knock off pests; monitor adults with yellow sticky traps; spray with insecticidal soap; invite beneficial insects and hummingbirds with native plants; weed; use reflective mulch |
| Wireworms | Insect |
Seedlings severed; stunting/wilting; roots eaten; tubers/bulbs bored |
Trap by digging 2- to 4-inch-deep holes every 3 to 10 feet, fill with mix of germinating beans/corn/peas or potato sections as bait, cover with soil or a board, in 1 week uncover and kill collected wireworms; provide good drainage; remove plant debris; rotate crops |
There are more than 100 varieties of potatoes! In the home garden, most people grow tan-skinned or red-skinned potatoes with white flesh.
To chose a potato to grow, think about how you like to eat them.
- Russets and long white potatoes are used to make baked, boiled, or fried potatoes.
- Round white potatoes are used for either boiled potatoes or potato chips.
- Red-skinned potatoes are often used for boiling or for potato salads.
There are also speciality potatoes in many shapes, sizes, and colors, including all-blue potatoes as well as potatoes with red or yellow flesh. We also love All Blue Potatoes! They’re delicious and, well, they’re truly blue!
Early Varieties:
- ‘Irish Cobbler’: tan skin, irregular shape (great heirloom potato for delicious mashed potatoes!)
- ‘Norland’: red skin, resistant to potato scab
- ‘Mountain Rose’: red skin and pink flesh, resistant to some viruses
Mid-Season Varieties
- ‘Red Pontiac’: red skin, deep eyes (easiest and most adaptable red potato there is to grow)
- ‘Viking’: red skin, very productive
- ‘Chieftan’: red skin, resistant to potato scab, stores well
Late Varieties
- ‘Katahdin’: tan skin, resistant to some viruses
- ‘Kennebec’: tan skin, resistant to some viruses and late blight
- ‘Elba’: tan skin, large round tubers, resistant to blight and potato scab
See our page on how to choose the best potatoes to grow in your garden for more information on recommended varieties.
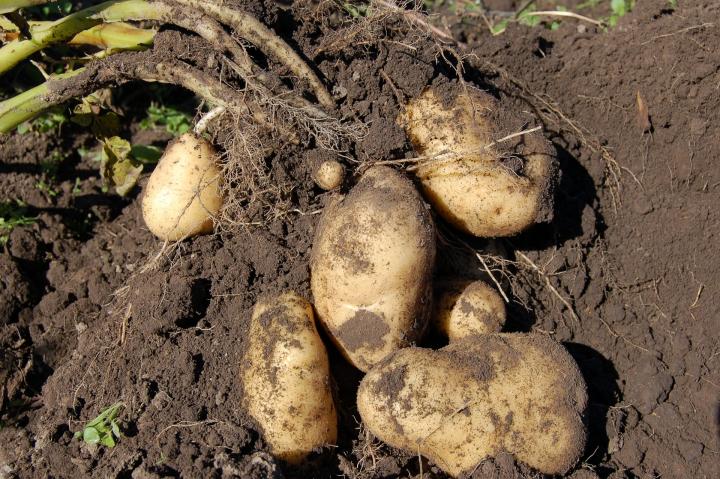
When to Harvest Potatoes
- Regular potatoes are ready to harvest when the foliage begins to die back. (See each variety for days to maturity.) The tops of the plants need to have completely died before you begin harvesting.
- “New potatoes,” which are potatoes that are purposefully harvested early for their smaller size and tender skin, will be ready for harvest 2 to 3 weeks after the plants stop flowering. New potatoes should not be cured and should be eaten within a few days of harvest, as they will not keep for much longer than that.
- Toughen up potatoes for storage before harvest by not watering them much after mid-August.
- Dig up a test hill to see how mature the potatoes are. The skins of mature potatoes are thick and firmly attached to the flesh. If the skins are thin and rub off easily, your potatoes are still too new and should be left in the ground for a few more days.
- Potatoes can tolerate light frost, but when the first hard frost is expected, it’s time to get out the shovels and start digging potatoes.
How to Harvest Potatoes
- Cut the brown foliage off and leave the potatoes for 10 to 14 more days before you harvest. This allows the potatoes to develop a thick enough skin. Don’t wait too long, though, or the potatoes may rot (especially in moisture-laden soil).
- Dig potatoes up on a dry day. Dig up gently, being careful not to damage the tubers. Avoid cutting or bruising potato skin. Damaged potatoes will rot during storage and should be used as soon as possible. The soil should not be compact, so digging should be easy.
- If the soil is very wet, let the potatoes air-dry as much as possible before putting them in bags or baskets.
- Don’t leave the potatoes that you have dug in the sun for long after they have been dug up from your garden, otherwise your potatoes may turn green. Green potatoes have a bitter taste due to the presence of solanine, and if enough is eaten, can cause vomiting and diarrhea. Small spots can be trimmed off, but if there is significant greening, throw the potato out.
Curing Potatoes
- Allow freshly dug potatoes to sit in a dry, cool, dark place (45 to 60°F / 7 to 15°C) for up to two weeks. This allows their skins to cure, which will help them keep for longer.
- After curing, make sure you brush off any soil clinging to the potatoes.
- Whether you dig your own potatoes or buy them at a store, don’t wash them until right before you use them. Washing potatoes shortens their storage life.
- After curing, do not put potatoes near apples; the apples’ ethylene gas will cause potatoes to spoil and go bad.
Storing Potatoes
If you’re buying potatoes to eat within a few days, storage is not an issue. You can store anywhere.
For long-term storage, potatoes need the following conditions: ventilation, cool temperatures, high humidity, and no light. Storing potatoes in your home isn’t easy unless you have a root cellar. Most home temperatures are kept at 65 to 75 degrees F and potatoes need be stored at cool temperatures to avoid sprouting.
Recommendation for Home Storage
- Store at cool temperatures (42 to 55 degrees F). Warm temperatures encourage sprouting and disease. Storage options include: an extra refrigerator set a few days higher than normal; an unheated entrance, spare room, closet, attic, cabinet, basement, or garage insulated to protect potatoes from freezing.
- The room must have high humidity. Potatoes are 80% water so it’s too dry, potatoes wither and dry out. Options are a damp cellar OR you can elevate humidity by storing tubers in plastic bags that are perforated (with many holes cut in the side) to provide fresh air OR/AND placing large pans of water in front of air source.
- Avoid all light to prevent greening. The location must be dark or use dark-colored, perforated plastic bags with many holes cut in the side to allow for air movement.
- Potatoes need ventilization. Even after harvest, potatoes still use oxygen and give of carbon dioxide so they must have fresh air. Never put potatoes in airtight containers Use perfermated bags as mentioned in steps above.
Find more tips on getting potatoes ready for the root cellar.
- Before planning your garden, take a look at our plant companions chart to see which veggies are most compatible with potatoes.
- Did you know: Potato promoter Antoine Parmentier convinced Marie Antoinette to wear potato blossoms in her hair.
- Grated potatoes are said to soothe sunburnt skin.
“What I say is that if a man really likes potatoes, he must be a pretty decent sort of fellow.”
–A. A. Milne, English writer (1882–1956)
Potatoes are naturally healthy. Not only are they fat-free and cholesterol-free but also an excellent source of vitamin C and a good source of potassium.
Check out our recipe archives to find potato recipes that range from plain to fancy!


