
molly’s dry-rubbed ribs
[My friend Molly made the most amazing ribs on Memorial Day. Prior to Monday, I thought I liked mopped, or barbecue sauced-up ribs. I am now officially a dry rub convert, and begged her to let us know how she did it. Thanks Molly!–Deb]
I started making these ribs last summer. I got inspired by an amazing BBQ I attended in Bed-Stuy at my friend Antoine’s friend Pete’s house. Pete has six jumbo grills with attached smokers or something ridiculous like that. At that BBQ, I think he smoked so much meat in his backyard that he probably violated some kind of zoning ordinance. The buffet table in the backyard groaned under the weight of at least half a dozen BBQ competition trophies. Pete is a serious BBQ chef. It was the first truly delicious BBQ pork I’d eaten since I had moved to NYC after living in North Carolina for two years.
Now I must provide the obligatory rant on my BBQ predilections/prejudices: I enjoy a tangy red sauce as much as anyone else. I especially love Ina Garten’s Barbecue Sauce that Deb introduced me to: brushed on a chicken thigh over a charcoal fire, it’s wonderful. But in my opinion, tomato-containing sauce of any kind does not belong on pork BBQ. It took just two years in Orange County, NC, home of the Tar Heels and the inimitable Allen & Sons Barbecue, to convince me of this.
There is only one way to do right by pork: cover it with a simple, spicy-sweet dry rub. Let it sit for a while. Slowly cook it in smoky, indirect heat, using a wood fire or natural charcoal, until the meat is tender enough to melt in your mouth. Then go hawg wild. It’s best to enjoy the meat without any sauce, at least at first. Sometimes, if I am in the mood, I will add a hot pepper vinegar to my pulled pork, but only after I eat some of it unsauced. I never add any sauce to ribs.
So one day last summer, after having grilled Pete on his BBQ technique (pun intended), I decided to try my hand at some spareribs. My first attempt was an astounding success, thanks in great part to some excellent instructions in the latest edition of the Joy of Cooking (recipe adapted below), as well as the wisdom of Master Pete. I added my own special technique along the way: dousing the ribs with Magic Hat No. 9 several times during the cooking process. This mixes with the dry rub to form a delectable crust on the outside of the ribs. Magic Hat No. 9 is a medium-bodied beer with an apricot flavor and aroma, so it mixes perfectly with the pork and the flavors in the rub.
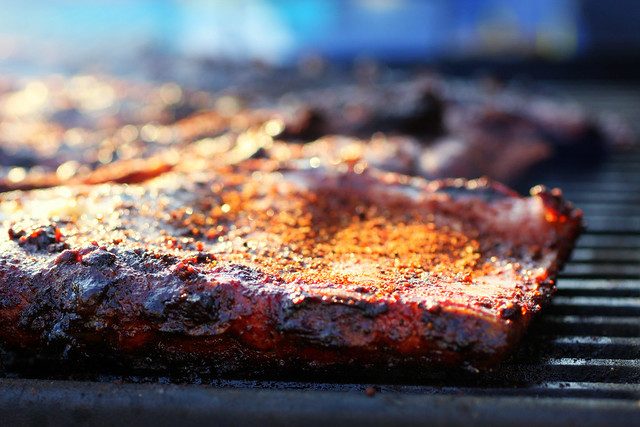
When you get these ribs right, the thinner pieces of meat hanging off the small end of the rack may have a spicy, very smoky, firm (but not dry) quality, while the meat in between the biggest ribs will be milder and meltingly tender. Make sure everyone gets at least one nice big fat rib. I personally like the chewier end pieces–they are almost like high-end jerky. I like all of it. It makes me well up with emotion.

Southern Style Dry Rub
Joy of Cooking, 75th Anniversary Edition
Molly’s notes: These ribs don’t need sauce. In fact, to sauce these ribs would be an abomination, so I don’t want to hear about it. Commenters who espouse gumming up these ribs with sauce will be scorned. By me. Deb will still be nice to them, but she’s nicer than I am.
You can make this less spicy by omitting the ground red (cayenne) pepper. You can make it more straightforward by omitting the cumin. I use nutmeg instead of mace, because who has mace sitting around their kitchen? Not me.
The ribs go really well with basic coleslaw–nothing too fancy. Deb made some scrumptious slaw for Memorial Day, and some tasty BBQ beans too. Hush puppies would have been great, too, but we don’t have a deep fat-fryer at Jocelyn’s place, unfortunately.
Makes about 2 cups of dry rub
1/4 cup packed dark brown sugar
1/2 cup paprika (sweet or hot)
1/4 cup chili powder
2 tablespoons ground red pepper
2 tablespoons ground cumin
1 teaspoon ground mace
1/4 cup salt
1/4 cup cracked black peppercorns
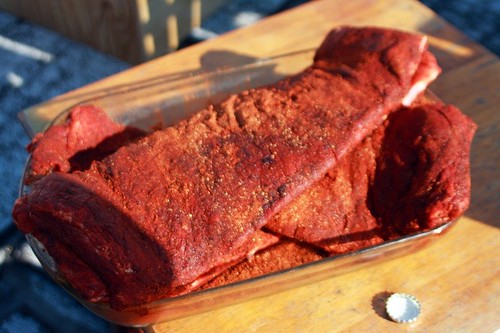
Make your spice rub and cover those ribs in it ASAP. The longer they sit in the spices, the better, but let them sit at least an hour. Let them sit up to 24 hours if you want. Wrap them in plastic and refrigerate them until it’s almost time to put them on the grill. You can let them sit at room temperature for 10-15 minutes or so before starting the BBQ process.
These ribs take about 3 hours total cooking time, sometimes more and sometimes less, depending on how hot your fire is and how thick the slabs of ribs are. [More detailed instructions below.]
Everything You Need to Know to Buy, Prep and Cook the Ribs
Buying Ribs: I use St. Louis-style ribs, because you get more meat for your money. When you smoke these babies for as long as three hours, you end up with a completely tender result, though the meat on baby-back ribs is technically “more tender.” I am feeding a crowd of hungry, eager people when I do this, and I would have to spend twice as much money (read: over $100) on meat if I used baby-back instead of St. Louis-style ribs. Plus there wouldn’t be enough room on the grill to make dinner for everyone. You have to eat at least six baby-back ribs to be happy, as opposed to three St. Louis-style’s. For my first experiments with BBQ, I used the pre-packaged racks of ribs that are available in most supermarkets’ meat departments for about $12 apiece, but the fresher they are, the better. In fact, I would advise you to ask your butcher when (s)he gets deliveries of fresh ribs, and plan your BBQ-ing accordingly.
Prepping the Ribs: I don’t cut out the connective tissue/membrane before cooking. I realize there is a massive, contentious debate about this in BBQ-ing circles, but I don’t really have an opinion on the matter, other than (1) it seems tricky and time-consuming; (2) I don’t know how; (3) I can’t imagine that the ribs could be any more tender. The membrane basically breaks down during the cooking process. Maybe it leaves a bit of a ultra-thin, crispy remnant on the bone side of the ribs. I don’t know. I don’t feel the need to perform this surgery. It seems like an unnecessary fuss if you ask me. Well, it looks like maybe I did have an opinion on the matter, doesn’t it? I like the membrane, OK? I like the crispy little membrane wafer you get when you’re done.
Cooking the Ribs:
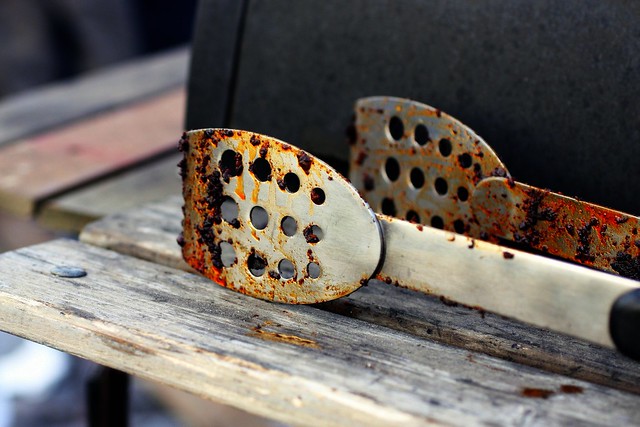
- Indirect heat is essential, and you don’t want the fire to be too hot. You cannot expect ecstasy if you rush ribs. I use my friend Jocelyn’s big charcoal grill with a smoker attachment. If stupid party-crashers want to throw things on the grill while you are tending to your precious pork, the smoker attachment is good because they can use that fire for direct heat, leaving the ribs to cook undisturbed in the bigger chamber of the grill. Just make sure they don’t leave the lid of the smoker attachment hanging open when they do this, or the ribs won’t get enough heat.
- I build two fires: one in the smoker attachment, and another one on the opposite end of the larger chamber. The ribs go in between the two fires. There’s enough room for three racks of ribs. Recently my friend Darren, a seasoned grillmaster, advised me to get a rib rack so I could make more ribs at once. I think this is because he has not yet been able to truly pig out on ribs to his heart’s content. I did buy one of these devices at Home Depot the other day, but I haven’t tried it, so I can’t report on how it works. If any of you readers have experience with the rib rack, I would be very interested to hear about it. (I got the kind that holds your ribs up on their sides, vertically, kind of.)
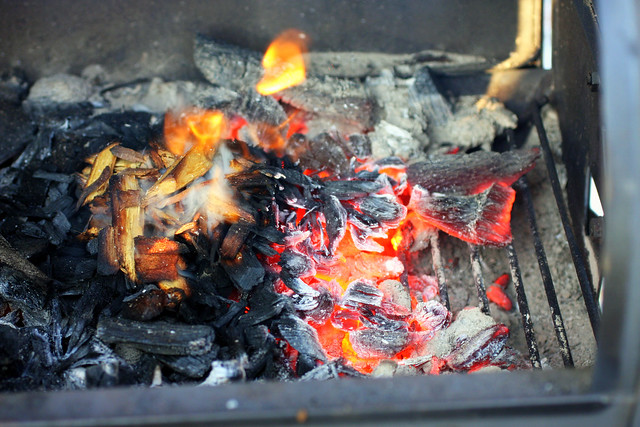
- Starting the fire: Darren usually starts the fire at Jocelyn’s, but I have been known to do this on occasion as well. We might start the fire with Match Light, just to get things going, but then we switch to natural hardwood charcoal. I get this at Whole Foods. You should have at least a couple bags of charcoal on hand whenever you make BBQ so you can continue to feed the fire. I also use mesquite or applewood chips (not charcoal) soaked with water to create smoke. These are available at Whole Foods as well, or at Williams-Sonoma, but if you buy them at Williams-Sonoma you might as well experiment with throwing dampened dollar bills on your fire. I add these (wood chips, not cash) three or four times along the way. I just throw a few handfuls on top of the fire in the smoker attachment, batten down the hatches and let the ribs bathe in smoky goodness. I honestly don’t know what the temperature inside the main grill chamber is. Darren speculated that it’s probably between 225 and 250 degrees, but this BBQ-ing business is an inexact science at best. If you are all wrapped around your thermometer, you’re not embracing the essential aspects of BBQ’s allure: the primal, the low-tech, the intuitive. Imagine yourself as Luke Skywalker, practicing the lightsaber blindfolded aboard the Millennium Falcon…
- Grilling the ribs: Once you have two nice piles of glowing hardwood coals, you put your ribs on the grill, meat-side down to start. Turn them over every 30 minutes. Every time the meat side faces up after turning, I lightly pour Magic Hat over the ribs. (Reserve at least three bottles for this purpose, and label them so your drunkard friends don’t sabotage your project.) Don’t dump the beer all over the ribs all at once–you want to kind of sprinkle it so it doesn’t wash away all the spice rub. Also, when I turn the ribs over, I reposition them on the grill. Rack 1 goes where Rack 2 was, Rack 3 goes where Rack 2 was, Rack 2 goes where Rack 3 was. This corrects for any differences in temperature within the grill chamber. For the same reason, I also turn the ribs so the small and large ends of the rack are facing different ways during the cooking process. The smaller ends get done a little bit more quickly than the big fat parts of the racks.
- Checking for doneness: The best way to tell if the ribs are done is to take a big pair of tongs and try to kind of twist the rack of ribs around a bit. If it holds firmly together and feels resilient, it’s either not done yet or you cooked it at too high a temperature and you completely screwed it up–better luck next time. If done right, the ribs should start to separate when you twist the rack. In other words, one should not need teeth to eat this meat.

